Background
Docker was first up on the list of tech to have a play with in 2022 and it has been quite a revelation. I wasn’t exactly sure what Docker was all about but have discovered that it is a fantastic technology and that it will only grow in useage/popularity and will change the way in which we develop, deploy and run our applications.
I haven’t yet used it in anger in production, but it has been a great fit for me in the dev environment. The application I am currently working on has multiple databases, a background service and a web application. I’ve been able to very quickly Dockerise these and have everything run locally.
Most of my time is spent developing the web application. Docker has allowed me to launch the databases and background service and then develop the web application locally, connecting to the databases within containers. The databases used to be hosted in Azure and shared with others which sometimes led to some instability, and not to mention the faffing about with the firewall rules whenever my connection drops or recycles when tethered to a 4G sim.
This post…
All of the code is up on GitHub: cortexGG
This article will walk through:
- Setting up a SqlServer container with a database
- Scripting out the creation of a database
- Seeding it with data
- Setting up a dotnet container to launch a background service (command line application)
- .net6 command line app
- connecting to one of the databases above
- Launching them all using Docker Compose
- Creating a locally running dotnet Web Application that connects to the database running inside Docker
- Pointing a SQL ide at the database so that we can interrogate the data and update the Database
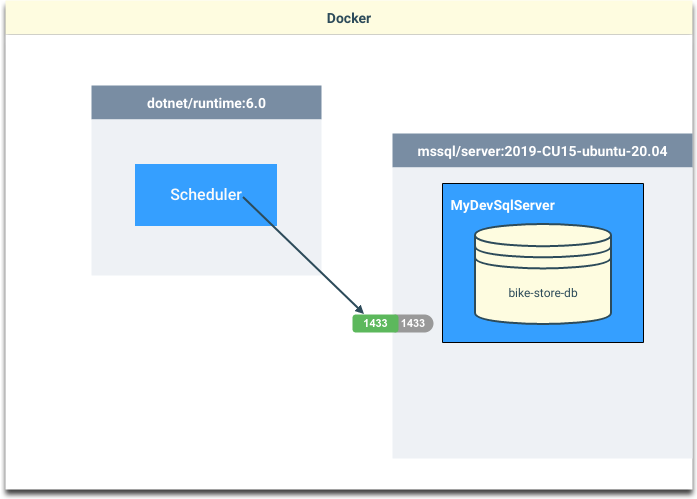
The local development environment will look something like this…
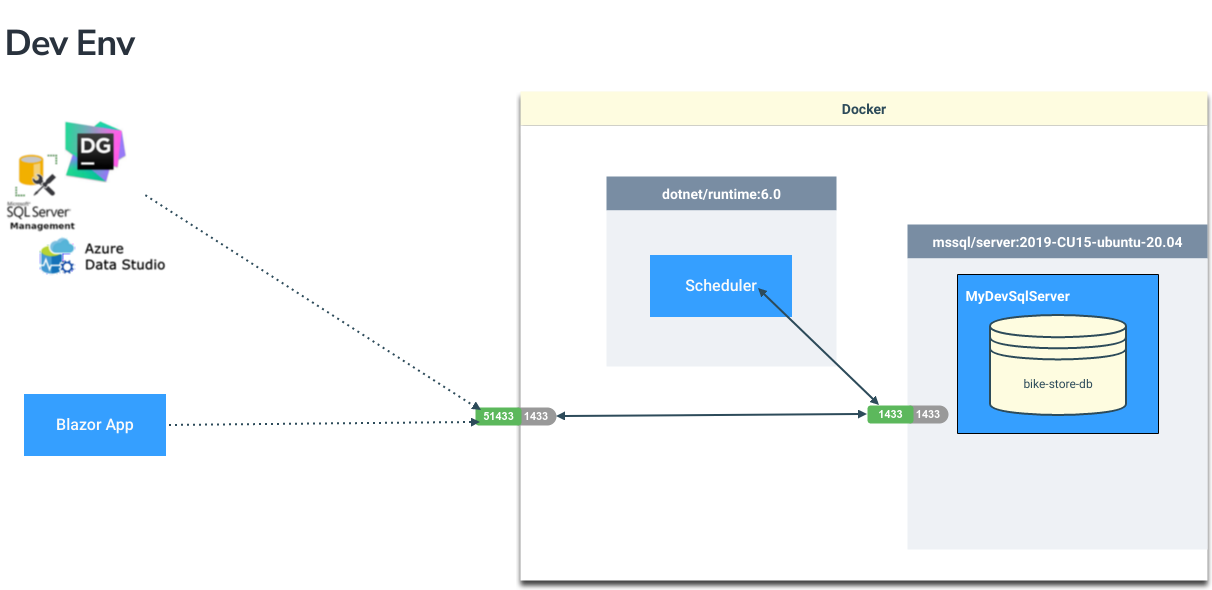
Both the database and background service will be running locally within Docker containers. We can then continue to build and run the application locally, outside of Docker, connecting through to the database running inside Docker. The background service can also sit there ticking along without having to run that separately locally.
We will look at how to set up persistent storage for the database so that we are able to retain the database state, even when we shut Docker down. We will show you how to stand up the database with the tables and stored procedures needed by the application and seed with test data.
The background service will be configured to connect to our database and demonstrate how we can connect to the database from within a Docker container.
Docker basics
Before diving in, first a bit about Docker, in case you are coming to this afresh. Docker allows you to create, well, more define really, the infrastructure and application into a single lump (an image in Docker speak) that can then be instantiated and run within a container. This approach allows you to run them locally and know that you will get exactly the same behaviour when you deploy it into another environment.
Docker can be used in isolation for development too and can bring with it many benefits:
- Every developer on the team gets their own sandbox - no shared resources such as the “dev” database
- Encourages you to script out the database which allows you to version changes alongside the application code
- Removes external dependencies to database servers (network or cloud instances), which can therefore reduce costs
Summarising the key Docker definitions relevant to this blog…
| Term | Description |
|---|---|
| Image | Describes exactly what is to be instantiated when loaded into a container. Which OS, application definitions and configurations |
| Dockerfile | A text file that describes how an image is to be built |
| Container | A running instance of a Docker image |
| Docker compose | This is a file that allows you to build a collection of containers that inter-operate with one another |
| Volume | This is used to persist data between container instantiations. We will be able to add data to our database, shut down the machine, restart Docker and stand up the containers and the data will have been retained. |
Setting up the dev env
1) Defining our SqlServer image
Docker images are almost always extending other images (I guess there is a root image somewhere!). The DockerFile shown below builds upon a base SqlServer 2019 image. This is the official and at the time of writing is the latest Microsoft SqlServer 2019 image that runs upon Ubuntu.
|
|
There are two mandatory environment variables that have to be specified:
- ACCEPT_EULA This needs to be set to Y and acknowledges that you have of course read the end user agreement in full and are happy with it
- SA_PASSWORD This will be the password that the System Administrator account (SA) is given. We’ll use this in our connection strings.
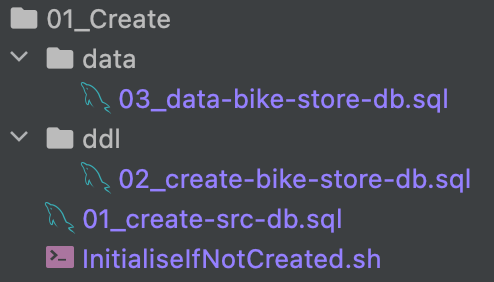
The key part of this DockerFile is the Database creation process (lines 8 and 9). This copies the folder with the creation scripts into the image and specifies the entrypoint for the image that will get called when the container is started. This entry point is a script that will initialise the database if it doesn’t already exist, or if it does will launch SqlServer 2019.
The inisialisation script is split out into 3 scripts that will…
- Create the database
- Build out all of the tables, views and stored procedures
- Seed the database with test data
Note
====
The bike store database is the sample taken from sqlservertutorial.net
    https://www.sqlservertutorial.net/sql-server-sample-database/
Initialisation script
The initialisation script is shown in full below.
|
|
Script explained
This is a bash script that will run inside the Ubuntu container. Some of the key bits are explained below:
- Line 7 checks for the existance of file called ‘app-initialised’, if it exists it skips the buildout process
- Line 28 is the command that puts this file there once it the database has been created
- Line 17 is a 15 second delay that is needed to give the container enough time to have fired up SqlServer before we start using it to create the database
- Lines 20 creates the database
- Lines 21 builds out the database (runs the ddl to create the tables and sprocs etc)
- Lines 22 populates the tables with seed data
The ‘01_create-src-testcases-db.sql’ script
There is not too much to this script. The initialisation script runs this script against the SqlServer master DB and creates a new database called bike-store-db and then outputs a log message to say that it has been created (useful for when we are checking the container status as it loads).
|
|
The ‘02_create-bike-store-db.sql’ script
This script runs against the bike-store-db DB we have just created and creates all of the schemas, tables, views and stored procs needed. A portion of the creation script is shown below.
|
|
The ‘03_data-bike-store-db.sql’ script
This script is also run against the bike-store-db DB and populates the tables that have just been created above with data. This script contains 10k lines, a portion of this script is shown below. Note that many of the tables have identity columns and need to have this turned off whilst we seed the tables with data.
|
|
2) Creating a Docker image to launch a background service
The Docker image for the dotnet command line application is pretty standard. Rider, VisualStudio and VSCode will all auto-generate very similar files if you ask it to add Docker support. It creates two images, one to build and publish the executable, and a second smaller image that only contains the dotnet runtime required to run the application (opposed to also including the bulkier sdk required to build it).
|
|
The important thing to remember to do before you build the image is to update the connection string so that it references our Docker hosted SqlServer.
|
|
| Property | Notes |
|---|---|
| Server | This wont yet make sense, but will be the name that we give to the container (server) |
| Initial Catalog | This is the name we gave to our database in the creation scripts above. ie. bike-store-db |
| User ID | We haven’t scripted out any special users and will use the default SA account |
| Password | This is the password we specified in the Dockerfile that creates the SqlServer image |
3) Docker Compose - pulling it all together
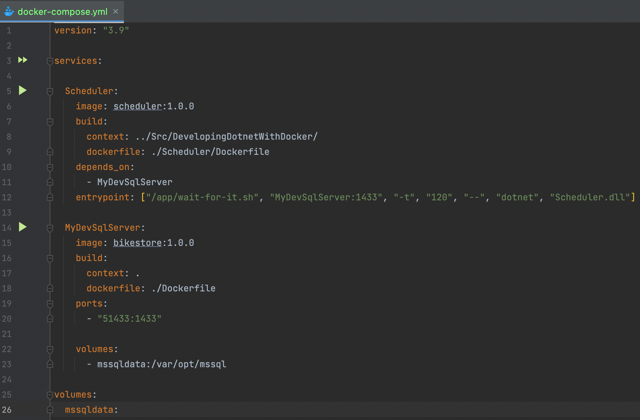
The Docker compose file lets us define multiple containers that may interact with one another and be instantiated together. The following Docker compose file defines two services:
- Scheduler - our background service that is built using the WorkHorse/Dockerfile image that we introcuded above in section 2. This will run within a Container called
Schedulerbut is not accessible outside of Docker. - MyDevSqlServer - a SqlServer 2019 instance that is built using the Dockerfile image we walked through in section 1. This is run within a container called
MyDevSqlServer, which is the name of the server that we specified in the Scheduler’s conneciton stringappsettings.json. Also note that we have exposed port51433to the local machine and mapped this to port1433which is the default port that SqlServer accepts connections on.
|
|
Some of the magic explained
Data Persistency
Line 23 maps a new data volume to /var/opt/mssql which is the directory that SqlServer stores all of its data files. This data volume, labelled mssqldata is stored outside of the Container within Docker and outlives the containers.
Are you ready yet?
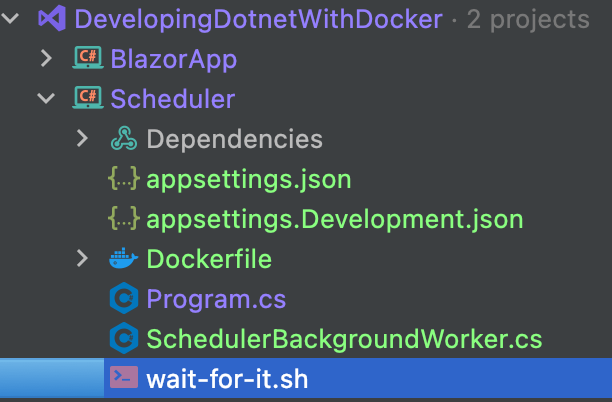
The SqlServer container can take a while to initialise, especially the first time as it will have to create the database, run the ddl creation script and seed the data. Docker compose will try and start the Scheduler as soon as it has launched the MyDevSqlServer container. Line 12 above changes the entrypoint to run /app/wait-for-it.sh which is a script that attepmts to connect to MyDevSqlServer on port 1433 for 2 minutes. Once successful it runs the Scheduler.dll.
The wait-for-it.sh script lives in the root of the Scheduler project and is copied to the output directory when built.
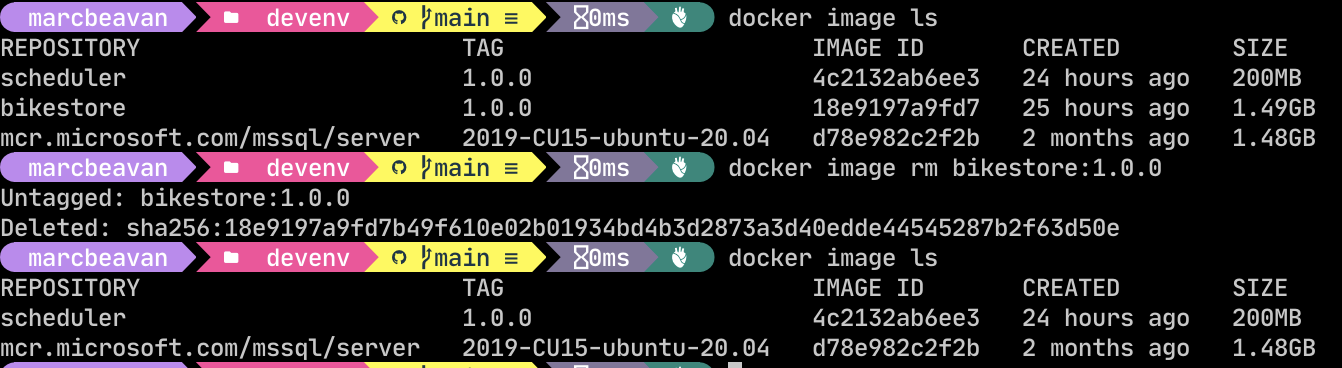
Starting the containers
The screenshot below runs through the full lifecycle of commands that you will want to use.
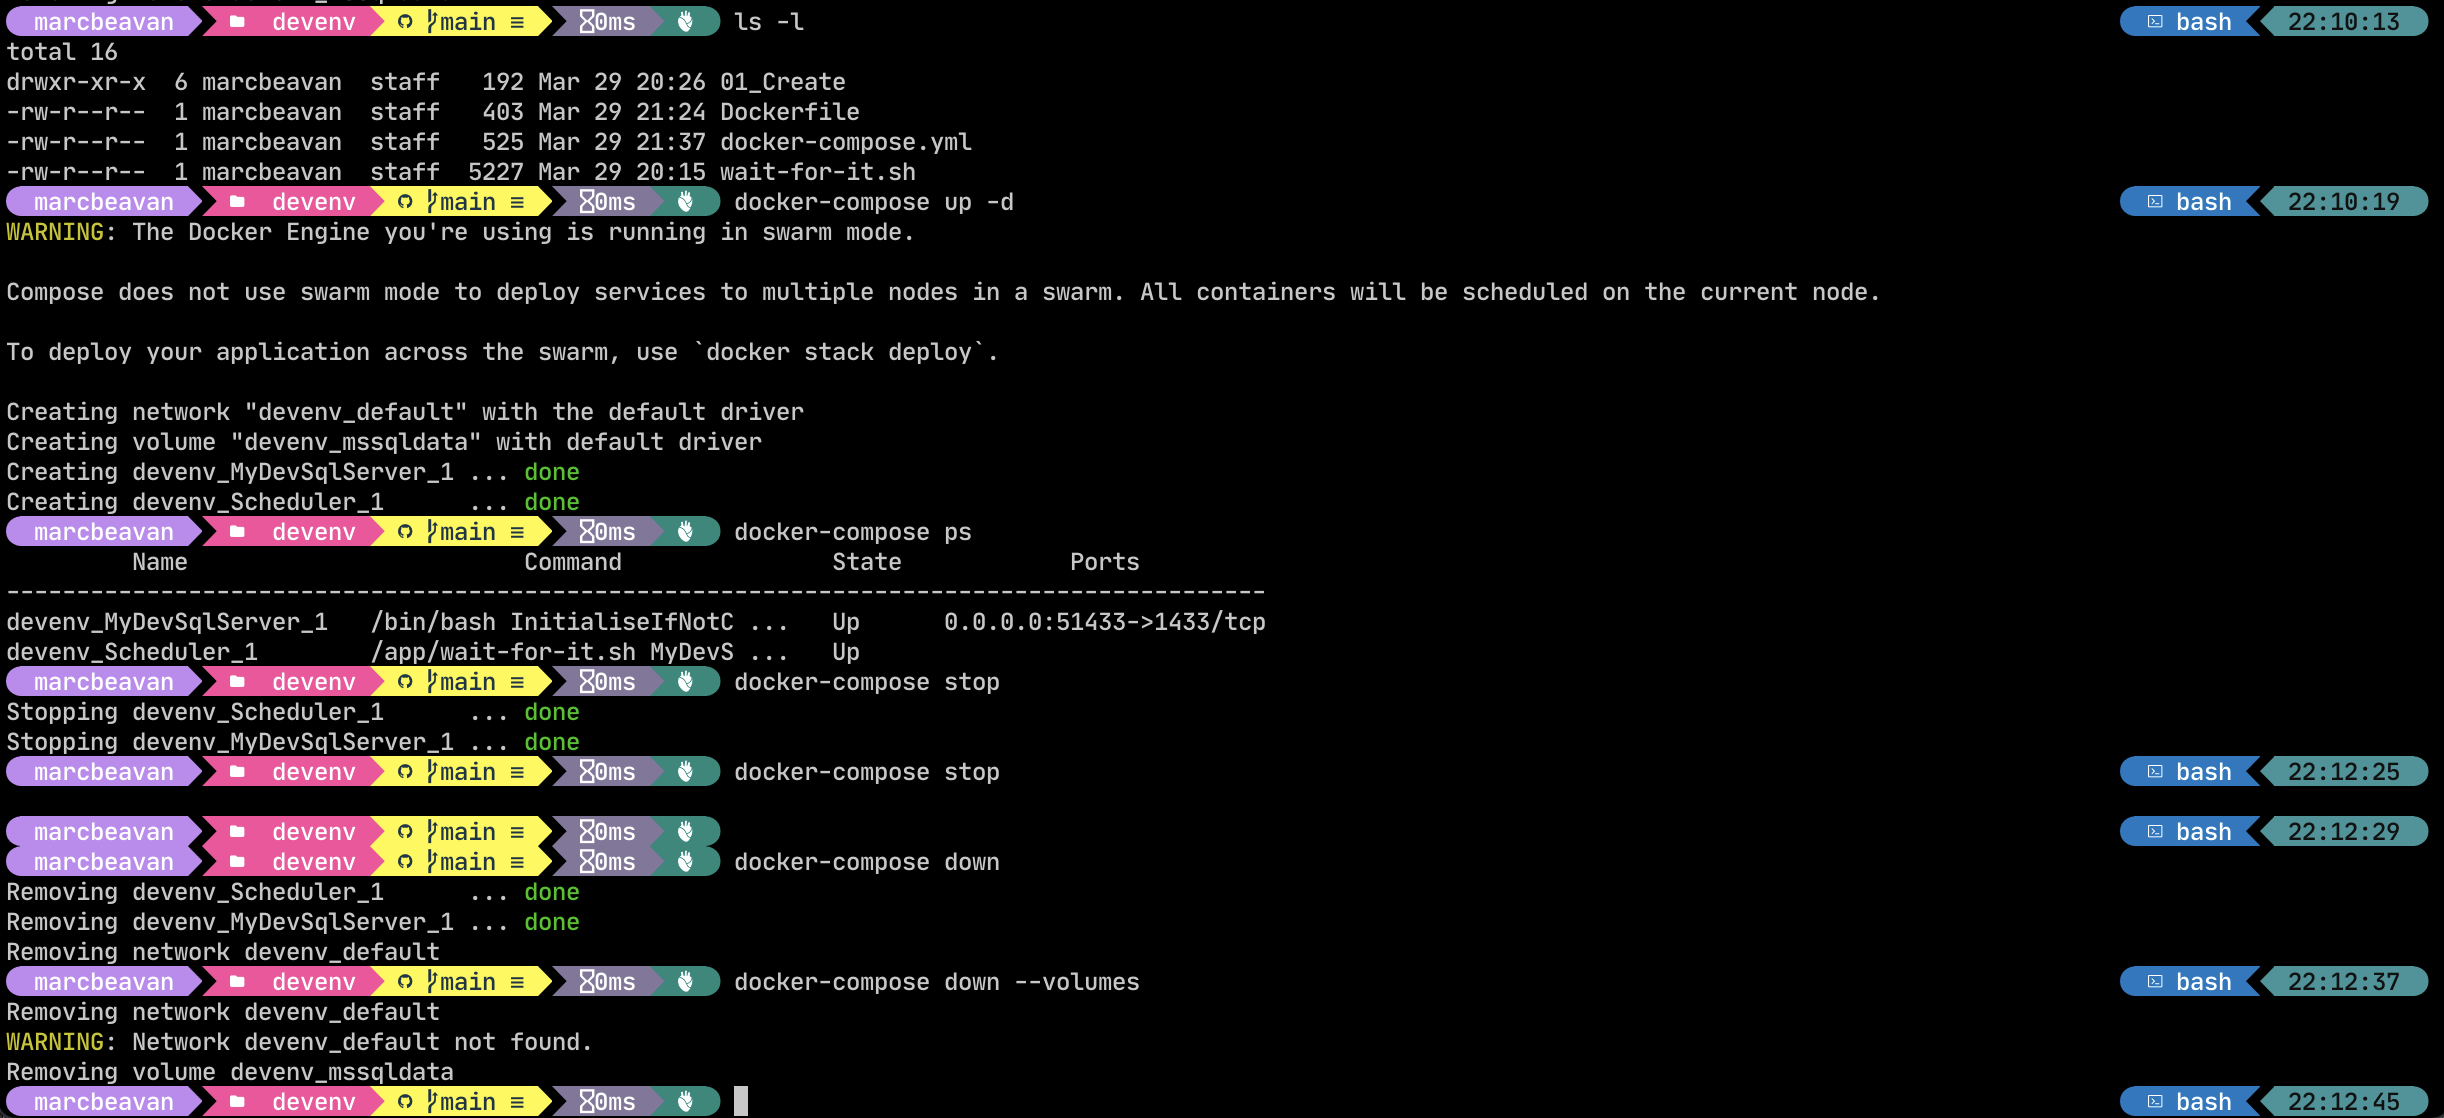
Starting in the ./DevelopingDotnetWithDocker/devenv directory…
|
|
This starts the two services defined in the compose file, running them in the background (passing in the -d flag for “detached” mode). If the containers are being run for the first time then Docker will automatically build the images. This will mean that it will have to pull down the SqlServer image and dotnet SDK and runtime images from the container registry which may take a while. Once it has these locally however then it will not need to do so again. Note that all of the base images referenced are to specific versions (opposed to :latest) which will mean that we are pinned to these versions and we wont be pulling down a fresh image every time an update is released. This is the recommended approach and puts you in control of when you want to upgrade.
|
|
This lists the processes that are currently running, and its status.
|
|
This stops the container.
|
|
This is a useful command and will remove the containers as well. The named data volume will be retained though. You can remove this also by including --volume which is useful when you want to rebuild the database from scratch.
|
|
If you are wanting to rebuild the database from scratch then you also need to remember to remove the image.
Connecting to the databases
From inside Docker
If you are wanting to connect to the database from a container running inside Docker…
…then it can reference the server name that you have given your service.
Ie. In the example above: MyDevSqlServer
so, the connection string for the bike-store-db running within the MyDevSqlServer SqlServer instance is:
Server=MyDevSqlServer;Initial Catalog=bike-store-db;Persist Security Info=False;User ID=SA;Password=!SomethingSecret123;MultipleActiveResultSets=False;Encrypt=True;TrustServerCertificate=True;Connection Timeout=30;From the host machine
If you are wanting to connect to the database from the host OS (outside Docker), then you need to reference localhost,51433…
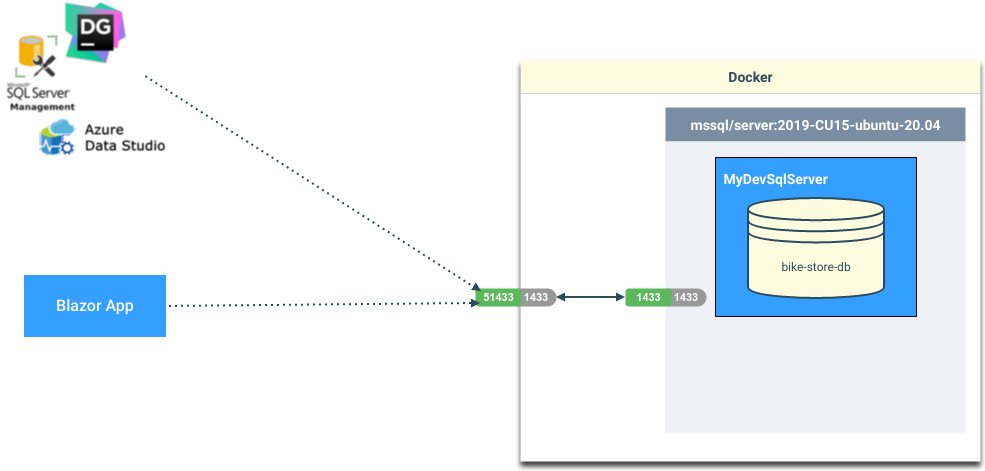
…then you can reference localhost as the Server, but you will need to specify the port 51433 as it is mapped to 1433 within the container.
Connection String
Server=localhost,51433;Initial Catalog=bike-store-db;Persist Security Info=False;User ID=SA;Password=!SomethingSecret123;MultipleActiveResultSets=False;Encrypt=True;TrustServerCertificate=True;Connection Timeout=30;Data Grip
Connection Config
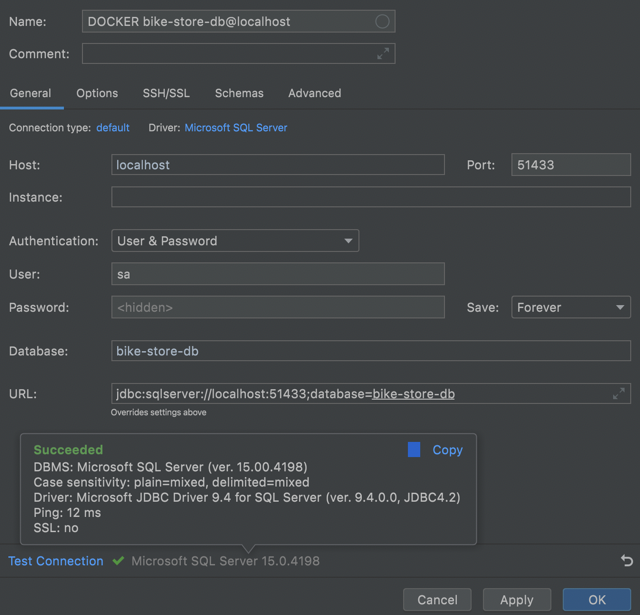
DataGrip
Blazor app
Once you have you SqlServer container running then you should be able to launch the Blazor app in the code sample and hitting the Bike Orders page will show you all of the orders from the last 7 days.
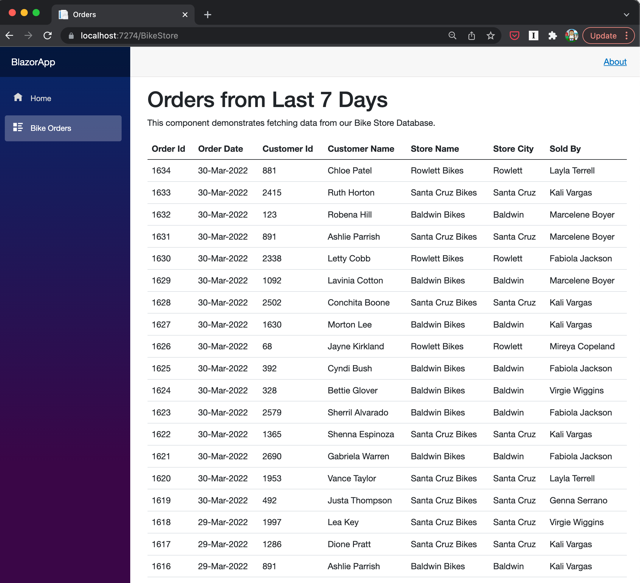
If the scheduler is also running then it will be adding a new order every 10 seconds. Refreshing the page will start showing new orders at the top of the list.
Rider makes it right nice and easy
Rider has some nice integration with Docker.
Docker Compose
Like Unit Tests, Rider adds Start buttons to the gutter, next to each service defined within the Docker compose file. This will start, or re-start the container/service.
You can hit the » double play button at the top of the compose file to start all of the services docker-compose up
Services
Rider also has a useful Services tool window that will show you:
- The containers that are running
- Which images have been created
- The data volumes that have been created
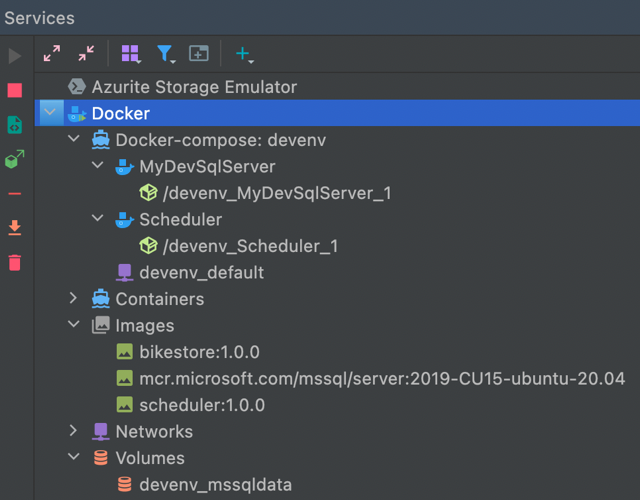
This is especially useful when you want to tear down your database and rebuild it.
Stuff to remember
- The Dockerfile defines how the image is to be built
- Once you have built an image it is cached by Docker
- Every time you start a container, it will check to see if the image exists already and use that
- If you change any of your DB build scripts, or scheduler code then this will not invalidate your Docker image
- You will need to delete the image if you want Docker to rebuild it afresh (or give it a new label in the Docker-Compose file)
- Also remember that we are using a named volume to store the SqlServer data files.
- If you leave this in place, then even if you delete the SqlServer image and rebuild/re-start it then it will:
- Create a new image
- Start the container
- The initialise script wont find the
/tmp/app-initialisedfile and run the creation scripts again - These will all fail as the ddl objects already exist and the insert scripts will violate primary keys
- If you do want to rebuild the image then also delete the named volume (as well as the image). This will then create everything again from the ground up.
- If you leave this in place, then even if you delete the SqlServer image and rebuild/re-start it then it will:
Wrapping up
VSCode, VisualStudio and Rider all have support for Docker when creating projects and it has been easy to retrofit into Docker into existing applications by simply dropping the Dockerfile and docker-compose.yml files into repositories.
Having the database running locally in your development environment has brought about many benefits for me.
- Complete control of my env - it is all running locally. No shared databases, no azure firewall rules to update, no network latency.
- Encourages better behaviours when it comes to scripting out database changes and makes it easier to manage and test changes
- I can retain my v1.0 database, build my v.1.1 database, test the build from scratch, test the upgrade process
- I have a handful of machines that I develop changes on (work, home, laptop etc). Being able to pull down my repository branch and rebuild the db containers in a couple of minutes improves productivity
It has taken a while to get my head around it all, especially at the start when restarting containers was not picking up changes that I had made locally that were not in the cached image being used.
I haven’t yet used Docker in production, but do have it on the todo list!
The sample application can be found on the CortexGG github.
That is pretty much it. A slightly longer post than planned!
Any comments or feedback then please fire them across to me on the twitters: @MarcBeavan mastodon - see link in footer.