
This blog runs through the steps required to integrate Windows AD into your Blazor Server application running on .netcore 6. I promised an example to someone who has been trying to get this up and running this week and thought I’d throw the info up here in case it is also of use to someone else. It seems that when it isnt wired up properly you get some unhelpful messages!
All of the code can be found on GitHub.
Blazor, for those who haven’t used it, has been a game changer since it arrived on the scene in 2018 (it is soooo productive). It is Microsoft’s .net based Single Page App technology. Over in Cortex Towers we have been using it to develop our own applications and products and also to deliver a number of client projects. Whilst our own projects have been hooking into Azure AD or using Identity framework for the authentication and authorisation, the client applications remain on-premise Active Directory based. Whilst not hugely complicated, you don’t get very friendly messages back when it isn’t set up properly.
This blog will:
- Detail what needs to be added to the Program.cs class that bootstraps the application
- Run through a few helper classes that allow you to develop the application without needing AD
- Plumb in some auth checks
- Secure some of the navigation items (hide them from users without authorisation)
- Secure the page themselves from direct access (from those who know the url)
Let’s get started
The example site that we are setting up builds upon the boilerplate blazor server application you get when you create a new project.
dotnet new blazorserver -o WindowsAuthOnce we have made our changes this will look like this…
We will set up 3 security policies for the application.
- Application Access - we will bind this to the AD Group “Everyone” (this could be restricted to a specific group)
- Administrator - we will bind this to an AD Group “Sample App Admins” (you will need to change this to an AD Group name that exists within your domain)
- ReportViewer - we will bind this to an AD group “AD Group Name” that my user doesnt have to test the unauthorised view checks
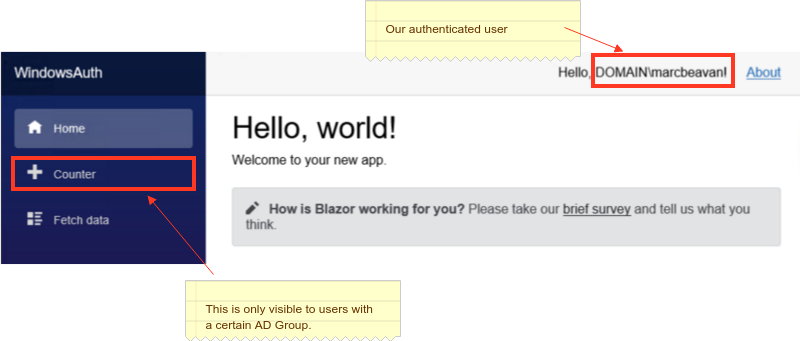
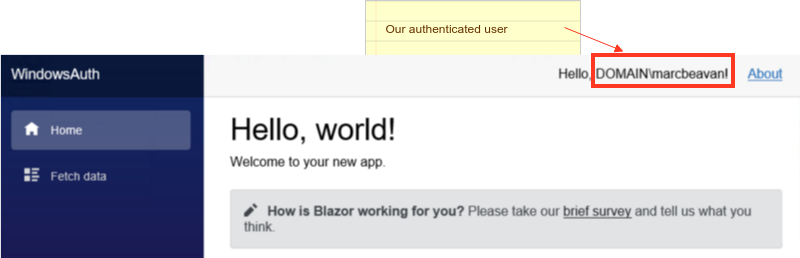
We will secure the Counter menu to this last policy so that it renders like so for my user:
The boilerplate blazor server app (counter with weather service) for Program.cs looks like this:
|
|
We need to replace line 4 with the following:
|
|
Breaking this down…
Specifiy Windows AD as the authentication method
Line 4: specifies that Windows should be used for authentication.
builder.Services.AddAuthentication(IISDefaults.AuthenticationScheme);Define a dev mode to ignore AD
Lines 9 to 16 let us run without any AD or have our profiles set up with the relevant AD groups. This makes development easier.
IsDeveloperRequirement is a class that extends the IAuthorizationRequirement marker interface (it has no methods) that is used to obtain the correct handler for the policy.
    public class IsDeveloperRequirement : IAuthorizationRequirement
    {
        // nothing to see here :)
    }
We create a dev handler for this policy requirement that authorises all requests.
    public class IsDeveloperHandler : AuthorizationHandler<Requirements.IsDeveloperRequirement>
    {
        protected override Task HandleRequirementAsync(AuthorizationHandlerContext context, Requirements.IsDeveloperRequirement requirement)
        {
            context.Succeed(requirement);

            return Task.CompletedTask;
        }
    }
Set up the AD Group to Policy bindings
We want to secure access to the application as a whole - ie. you need to be a member of the AD Group blah (Everyone in the case below) in order to use it. We also have two special types of users, Administrators and ReportViewers. We create policies for these, binding the AD Group Name to the policy so that we can use these in the application.
Lines 20 to 29 sets this up…
    //Prevents access to any part of the application without the specified role
    //https://andrewlock.net/setting-global-authorization-policies-using-the-defaultpolicy-and-the-fallbackpolicy-in-aspnet-core-3/
    options.FallbackPolicy = new AuthorizationPolicyBuilder()
        .RequireRole("Everyone")
        .Build();

    // In the github repo the constants below have been added to the Policies class
    options.AddPolicy("Administrators", policy => policy.RequireRole("Everyone"));
    options.AddPolicy("ReportViewers", policy => policy.RequireRole("AD Group Name"));
Applying the policies
You can apply policies to both:
- Portions of content within of a page
- Entire pages
Content
Line 8 applies the authorisation check. If the user is authorised (satisfies the policy ReportViewers) then contents of the <Authorized> are rendered.
|
|
Page level
You can apply policies via the Authorize attribute.
|
|
You can apply auth checks in a number of different places. If you want to dig deeper into this then Matt Champion covers it very nicely on his blog.
Wrapping up
That is pretty much it. This was intended to be a intro (simple) to getting Windows AD integrated into a blazor app. It gives you a taste of some of the custom policies which let you apply some weird and wonderful rules. This is using policy based authorisation. You can use role based auth too. That will be a topic for another post.
The sample application can be found on the CortexGG github.