We have been running a pi-hole at Cortex Towers since we started 4+ years ago and it has proven to block out a bucket load of adverts and tracking traffic.
The pi-hole acts as a DNS for the local network which means all internet traffic gets passed through it. The pi-hole then screens each request to see if it features on a blacklist of known advert or tracking domains and if they are, then it blocks them. This results in less traffic being requested leading to better performance, and better security, with less info leaking to the leeches out there.
This post walks through the steps I followed to get the latest version of the pi-hole up and running inside Docker, running on a Raspberry Pi 3 and hooked into my home network which is running Google Nest. All built from my Mac, although that doesn’t make any difference.
The high-level steps to rattle through are listed below:
- Create a Raspberry Pi OS image
- Log in to the Pi and update it with the latest OS patches
- Install Docker
- Create / configure our pi-hole image that we will be running
- Assign the Pi-Hole fixed IP Address (from Google Nest)
- Make the Pi-Hole the primary DNS
- Test that it is working
1) Create a Raspberry Pi OS image
Those nice (and clever) people at raspberry HQ have made a little utility program called Pi Imager.

- Download Pi Imager
- Select ‘Raspberry Pi OS (64-bit)’ as the Operating System If you have an older Pi (Pi 2 or Pi Zero W) then you will need to select the 32-bit version. Docker and Pi-Hole will work with these too.
- Configure the OS image
The imaging software lets us set:
- the machine’s name
- the wifi to connect to (if not using ethernet)
- a new password for the pi user
- enable SSH - this is particularly useful if you want to remote straight in and not have to faff about attaching a keyboard, mouse and monitor.
My config…
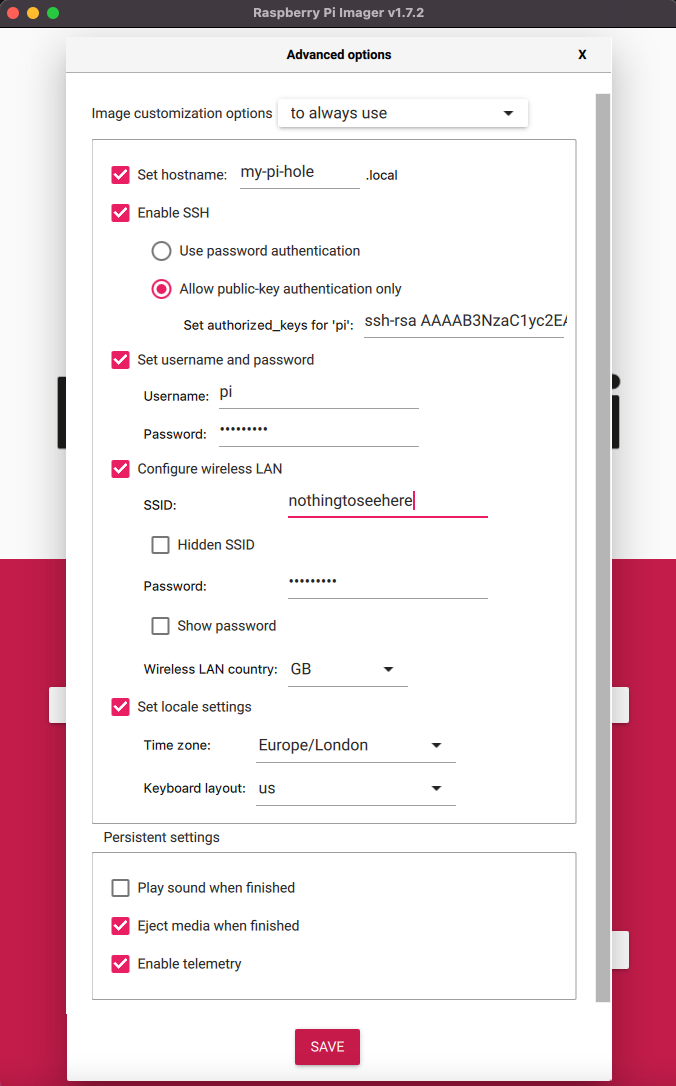
Once you’ve set everything up then press ’’ and wait for it to finish writing the image to the SD card.

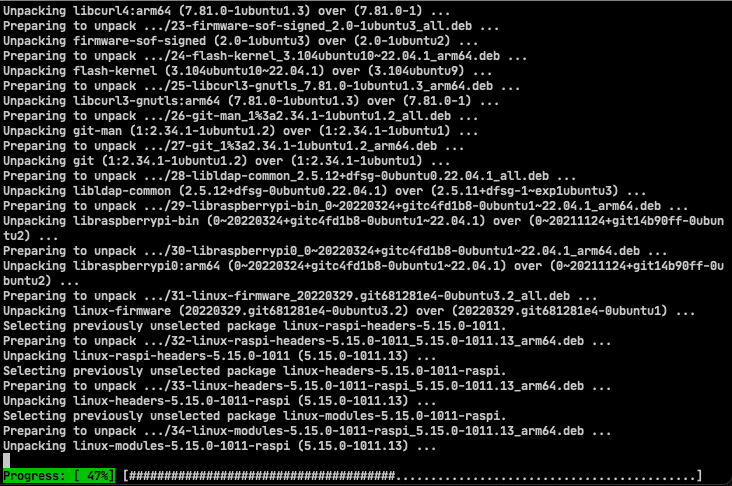
2) Log in to the Pi and update it with the latest OS patches
- Pop your freshly flashed SD card into your pi.
- Connect the pi to your router with an ethernet cable.
If you are not sitting next to your router then you can leave this step until the end and set the pi up using the wifi connection.
- Finally, turn it on and let it boot up - this may take a minute or so…
I hate cables and faff and chose to do the next set of steps by remotely ssh’ing onto the pi from my Mac. To this…
- Open up a terminal
- Try pinging the machine name to make sure it has booted
> ping my-pi-hole
PING my-pi-hole.lan (192.168.86.248): 56 data bytes
64 bytes from 192.168.86.248: icmp_seq=0 ttl=64 time=8.249 ms
64 bytes from 192.168.86.248: icmp_seq=1 ttl=64 time=48.516 ms
64 bytes from 192.168.86.248: icmp_seq=2 ttl=64 time=96.484 ms
Once the pi is alive, ssh on to it.
> ssh pi@my-pi-hole
pi@my-pi-hole's password:
Linux my-pi-hole 5.15.32-v8+ #1538 SMP PREEMPT Thu Mar 31 19:40:39 BST 2022 aarch64

The programs included with the Debian GNU/Linux system are free software;
the exact distribution terms for each program are described in the
individual files in /usr/share/doc/*/copyright.

Debian GNU/Linux comes with ABSOLUTELY NO WARRANTY, to the extent
permitted by applicable law.
Last login: Sun Jul  3 22:19:00 2022 from 192.168.86.45
pi@my-pi-hole:~ $
Before we install Docker and the pi-hole software onto the pi, we want to apply any OS patches that are available.
To do that we need to run the following two commands.
sudo apt-get updateand
sudo apt-get upgradeEach of these will spew an amount of text to the terminal and may take a few minutes to complete.
3) Install Docker
The next step is to install Docker.
Docker is a container engine that, for our purposes today, will allow us to run a self-contained pi-hole container within it. This container is kind of like a virtual machine, but lighter weight than the VMWare fatties you may be used to. The pi-hole container (well, image to use the correct terminology) weighs in at just under 300Mb and includes its own Debian OS, and all the tech that it needs to run (PHP, a web server a DB etc.). It is completely self-contained and fully configured - meaning that you dont need to fight with the various infrastructre components that you’d otherwise have to set up on you pi.
To install docker…
-
Download the setup script
curl -fsSL https://get.docker.com -o get-docker.sh -
Run the script
sudo sh get-docker.sh -
Add our
piuser to the docker groupsudo usermod -aG docker pi -
Reboot the device for this change to take effect
* sudo reboot
Our ssh session to the device will be closed. Once the pi has restarted then we will be able to ssh back on to it.
> ssh pi@my-pi-holeOnce on, then we can check that Docker has been installed and is working by running the command below.
> docker run hello-world

Hello from Docker!
This message shows that your installation appears to be working correctly.
....
4) Create / configure our pi-hole image that we will be running
Excellent. We can now get the pi-hole container setup. We will be using docker-compose which sits on top of Docker and allows us to finely tune and coordinate multiple containers. We will be using it to manage just the single pi-hole container, but it is very cool tech and a better example of what you can use it for can be found here.
To install docker-compose…
-
Download the setup script for our OS version
> sudo curl -L "https://github.com/docker/compose/releases/download/v2.6.1/docker-compose-$(uname -s)-$(uname -m)" -o /usr/local/bin/docker-compose -
Move the script into our bin directory so that we can run it from anywhere
> sudo mv /usr/local/bin/docker-compose /usr/bin/docker-compose -
Make it executable
> sudo chmod +x /usr/bin/docker-compose
We are now ready to create our pi-hole image. We configure this using yaml.
-
Create a pihole directory to keep the file in
-
Create a new file called
myPiHole.yaml -
Paste the following into it. If you are using vi as I am you need to hit
ito insert text, copy the text below and paste it into your terminal. Hit escape to come out of edit mode and then type:wqto write the contents to disk and exit the vi application.1 2 3 4 5 6 7 8 9 10 11 12 13 14 15 16 17 18 19 20 21 22 23 24 25 26version: "3.8" services: pihole: container_name: pihole hostname: my-pi-hole.lan image: pihole/pihole:latest restart: always ports: - "53:53/tcp" - "53:53/udp" - "67:67/udp" #This is required if you enable DHCP server on PiHole - "8080:80/tcp" volumes: - './etc-pihole/:/etc/pihole/' - './etc-dnsmasq.d/:/etc/dnsmasq.d/' environment: - TZ= 'Europe/Belfast' - WEBPASSWORD=ChangeThisToSomethingElse! - DNS1=1.1.1.1 - DNS2=1.0.0.1 #Recommended but not required (DHCP needs NET_ADMIN) cap_add: - NET_ADMIN
Other than changing the WEBPASSWORD on line 20, you don’t need to do anything else. You can find more information on the tweakable settings available on the docker-pi-hole github site.
Fire in the (pi)-hole
It’s now time to start up the pi-hole. This is nice and simple…
> cd ~/pihole/
> docker-compose up -d
The first time you run this, Docker will:
- Pull down the latest
pihole/pihole:latestpihole image from the Docker repoistory hub - Set the environment variables you’ve specified above
- Bind the directories and ports you’ve specified above and start the container
The command has the -d switch which runs it in detached mode. This means that it runs merrily away in the background. We can check in on it by using the following docker command:
>pi@my-pi-hole:~ $ docker container ls
CONTAINER ID   IMAGE                  COMMAND      CREATED      STATUS                PORTS                                                                                                                                            NAMES
ebc5d92cbe1f   pihole/pihole:latest   "/s6-init"   5 days ago   Up 5 days (healthy)   0.0.0.0:53->53/udp, :::53->53/udp, 0.0.0.0:53->53/tcp, 0.0.0.0:67->67/udp, :::53->53/tcp, :::67->67/udp, 0.0.0.0:8080->80/tcp, :::8080->80/tcp   pihole
This shows you the output that I received whilst writing this blog post, 5 days after setting it up.
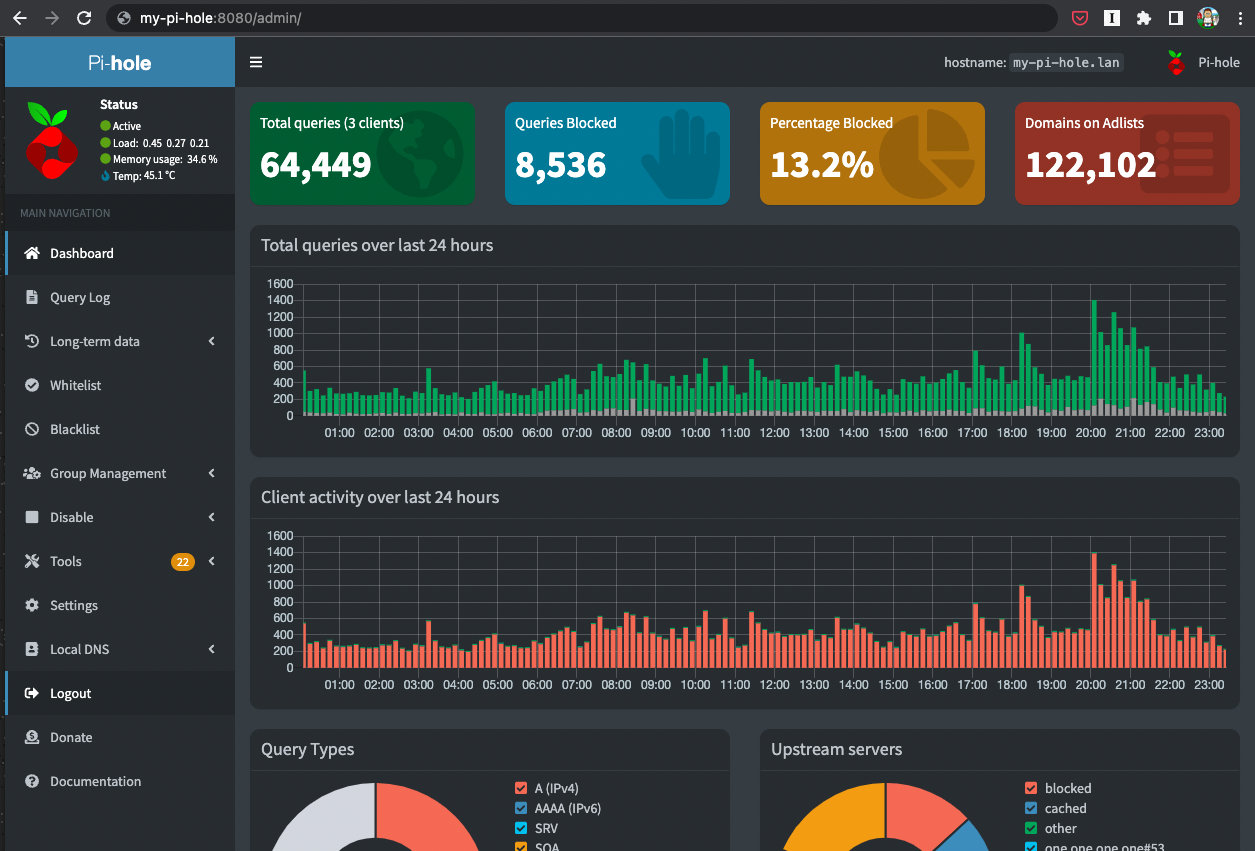
A friendlier test is to hit the pi-hole web server that is running within the docker container. The URL for mine is: http://my-pi-hole:8080/admin/
If you see something similar to that below then all is well! By similar I mean it renders the page. All of your numbers will be 0 as it is not yet wired up.
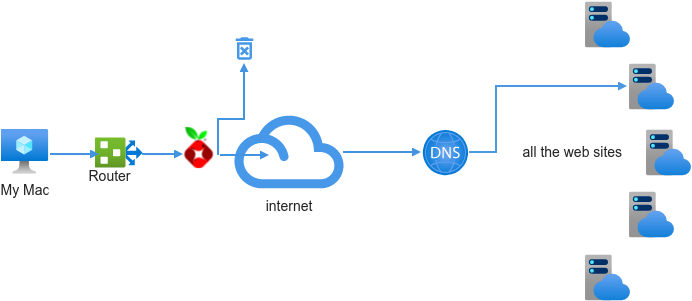
All we now need to do is hook the pi-hole up as the DNS. If that means nothing to you then a simplistic way of thinking about it is that currently when you access a site from your computer, the request is sent to your router, this will go out to the DNS that is set up to find out the address of the site you want to visit. It will then use that address to make the request.
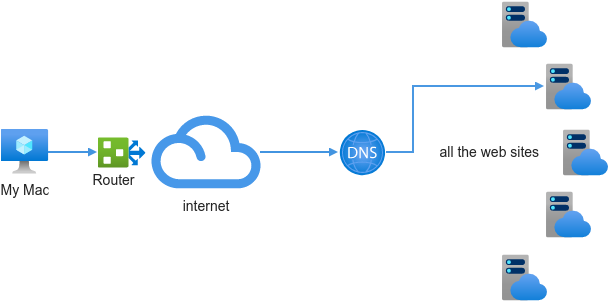
What we want to do is put the pi-hole in between the router and the public DNS. The pi-hole maintains a long list of all the sites that serve up adverts or are used to track your activity and if the request is to one of these sites then it blocks the request. If it isn’t on the naughty list then it will forward the request onto the public DNS as it would have done previously.
5) Assign the Pi-Hole fixed IP Address (from Google Nest)
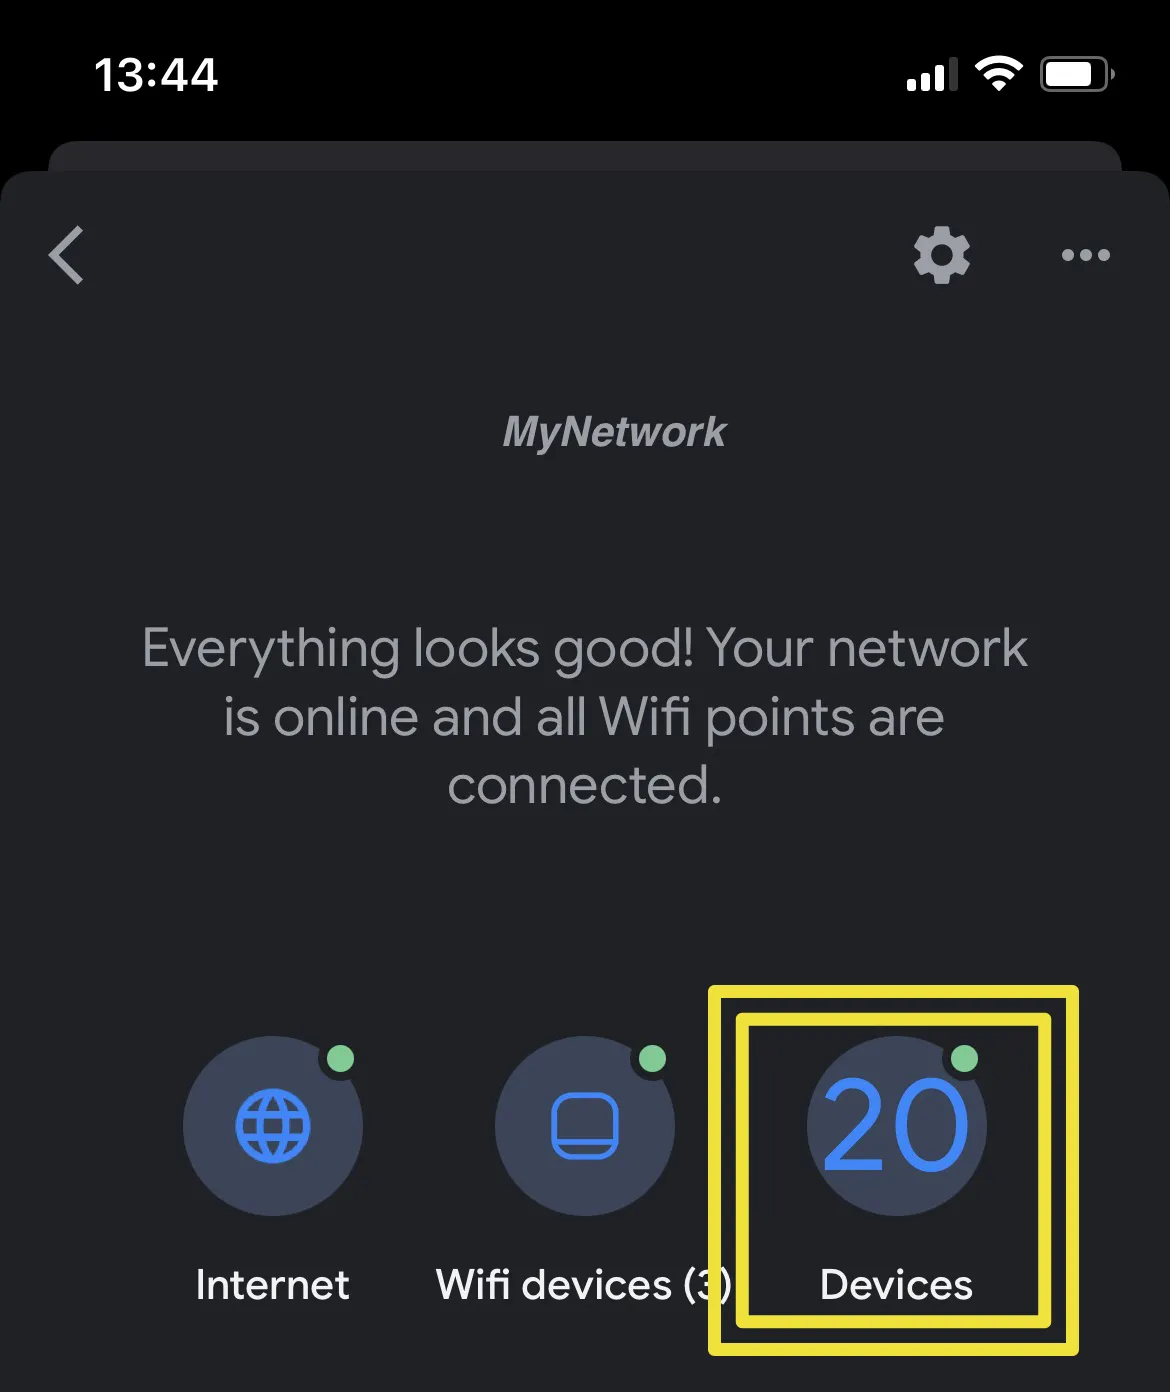
To slide the pi-hole in as our DNS to intercept the traffic, we need to ensure that it is always in the same place and assign it a fixed IP address. I use Google Nest for my home network which has an excellent app that I can configure things from my phone.
-
Launch the Google Home app
-
Click on Wi-Fi
-
Select ‘Devices’
-
Scroll through the list of devices to find the pi-hole device
-
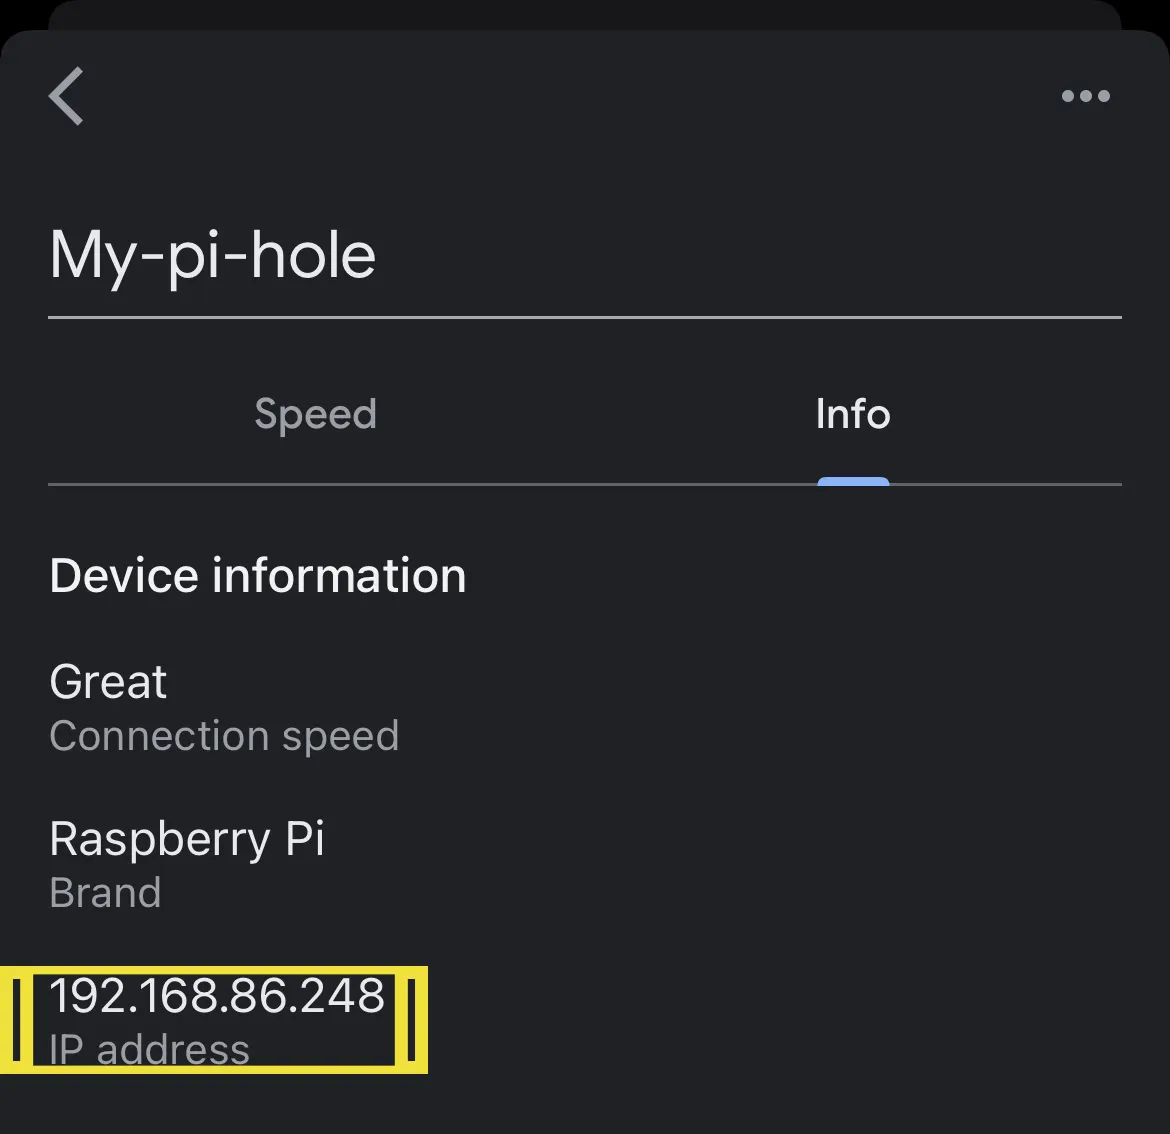
Select it and click the ‘info’ tab
-
Take a note of this IP address and the MAC address that is displayed beneath the IP
-
Go back to the home screen and click the settings cog at the top
-
Select Advanced Networking

-
Select DCHP IP Reservations

-
Find the device ‘my-pi-hole’ (and double-check the MAC address to confirm) and select it
-
You will then be asked to assign it an IP address. You only control the last number. You can put in any number between 1 and 254, that isn’t already assigned. I usually stick with the one it already has.
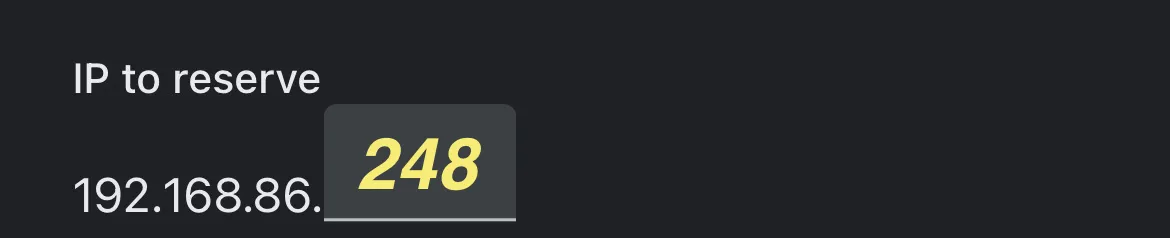
-
Hit the save disk icon at the top and you will see your device added to the list of IP reservations.
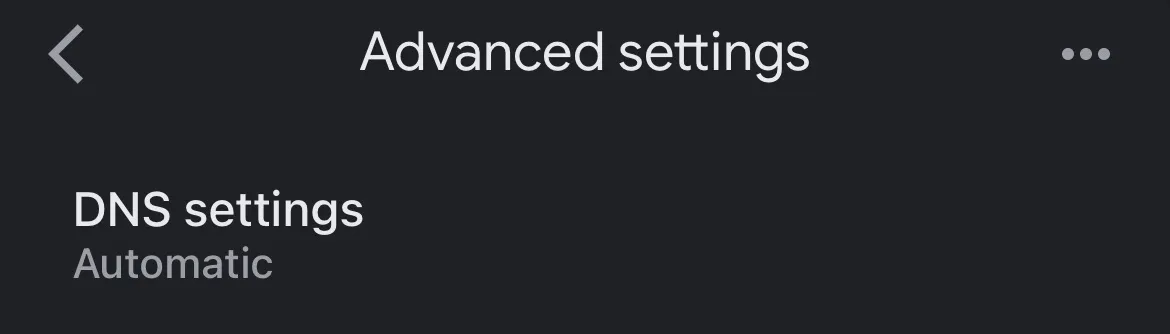
6) Make the Pi-Hole the primary DNS
Almost done. Just need to set this fixed IP address as our DNS entry
-
From the Advanced Networking menu, select DNS Settings
-
Select Custom
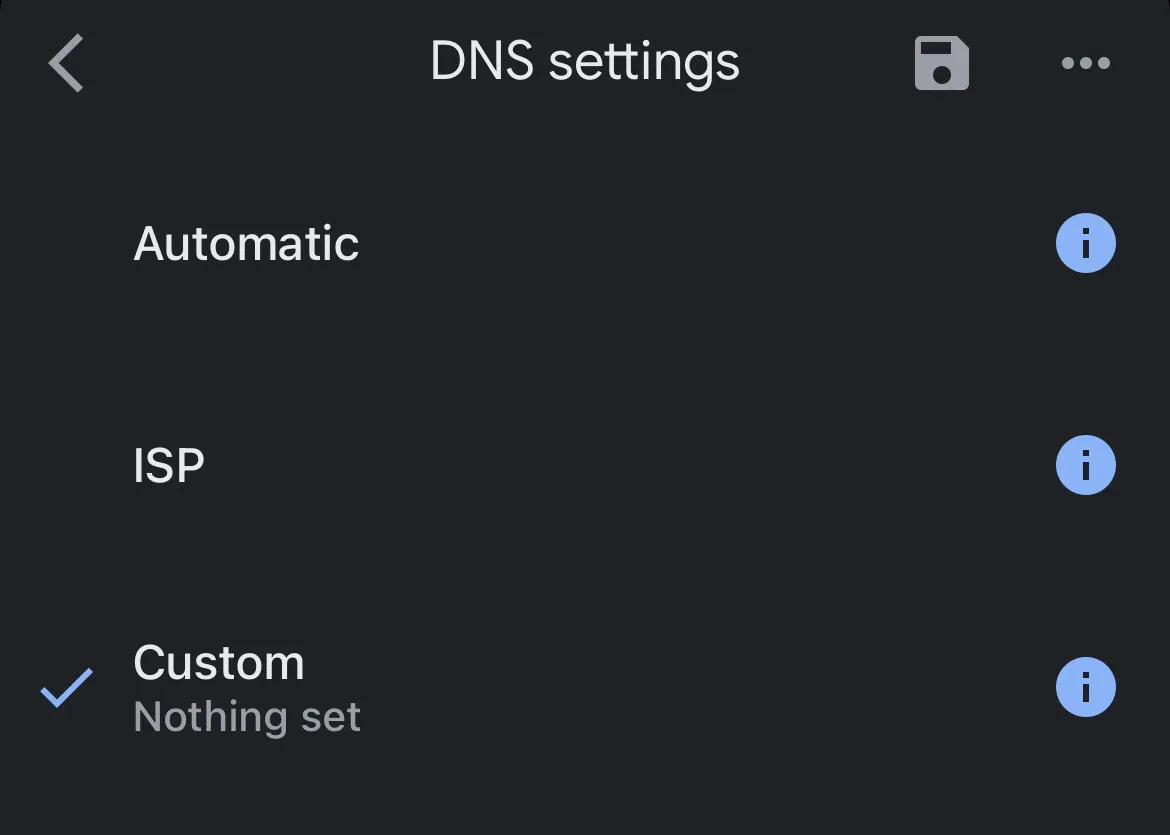
-
Enter the IP address in full. Normally this is an external provider like Google (0.0.0.0) or Cloudflare (1.1.1.1), but we are setting it to our trusty pi-hole. Hit Save.
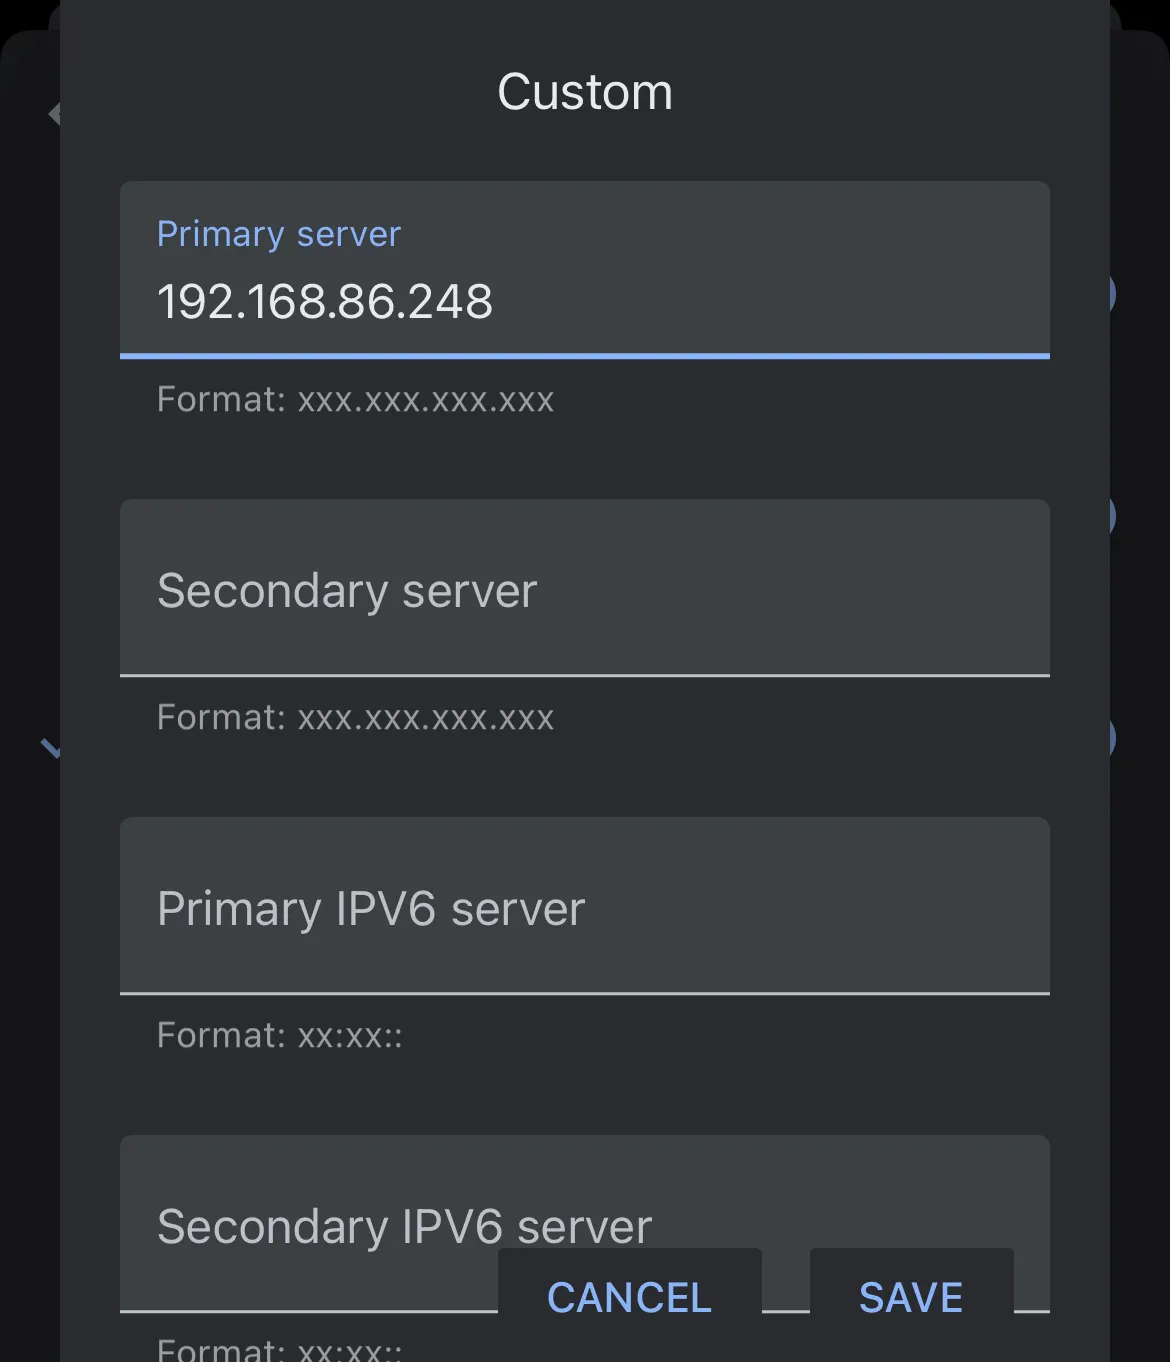
-
Check the details and hit save at the top.
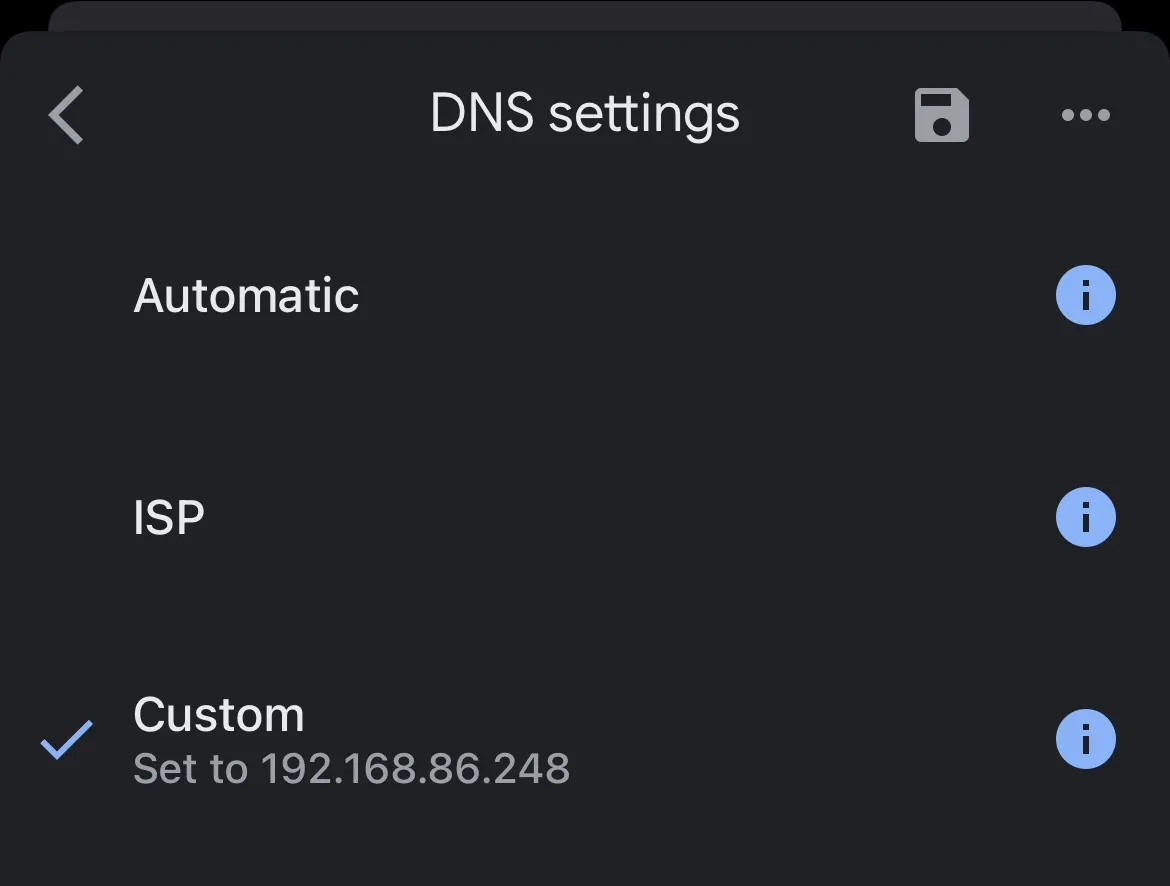
This will spin for 5-10 seconds whilst it applies.
You are done.
7) Test that it is working
The easiest way to test the pi-hole is to use your mobile. Turn off wifi (so you are not going through the pi-hole) and hit the following pi-hole test site:
[https://fuzzthepiguy.tech/adtest/](https://fuzzthepiguy.tech/adtest/)
This delivers a multitude of popup ads, banners and trackers.

Now connect back to your Wi-Fi and refresh the page.

Wrapping up
That is it. Not the most accessible things to set up, I think my mum would struggle with this one, but it is well worth it.
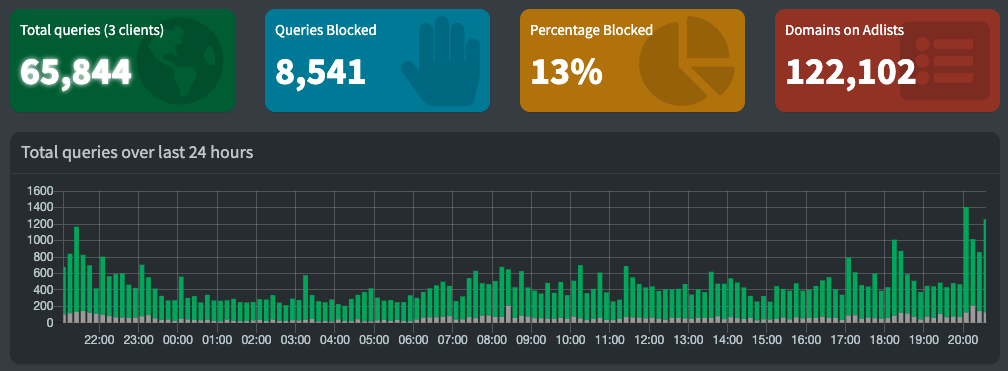
Having it up and running for a week now the stats are already impressive.

It has been blocking between 10% and 20% of requests each day. The pi-hole dashboard has some nice visuals, and more importantly if there is a site that is being blocked that you need to get through to then you can manually add them to the whitelist.
There’s lots of good documentation Here
If any of the info is out of date, is wrong, or can be made clearer then hit me up on the twitters.